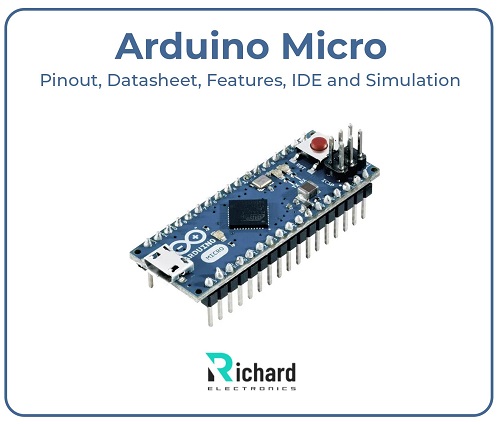
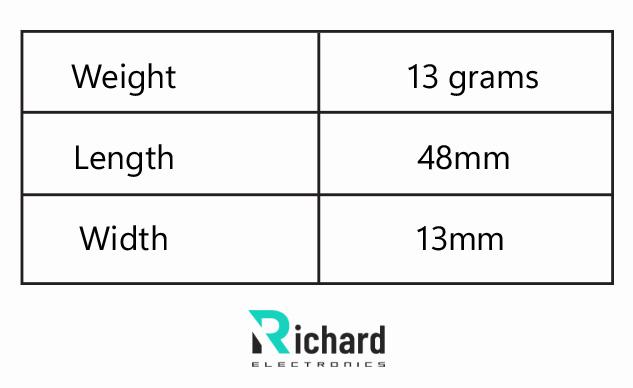
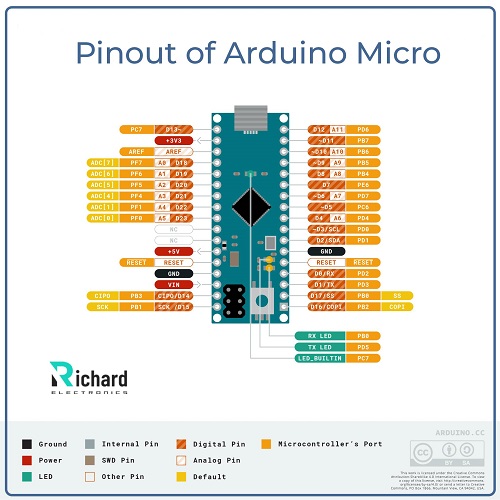
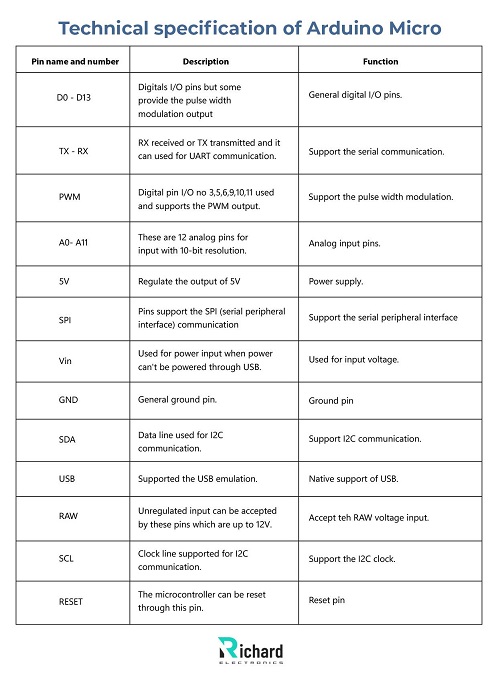
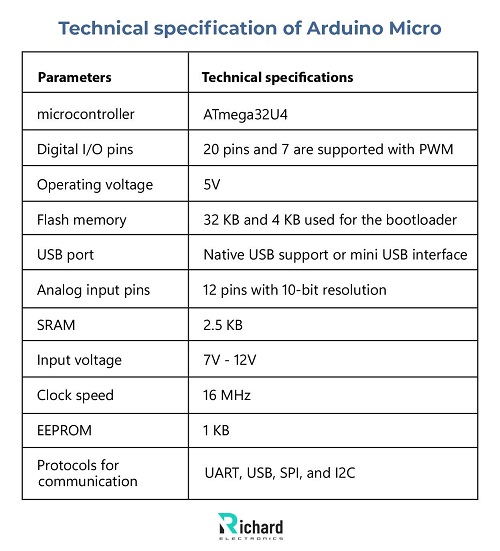
Arduino Micro is equipped with a built-in USB port, making it ideal for interfacing with other computers without using any third-party processors. For instance, we can use Arduino Micro as a mouse or keyboard by plugging its USB Port into an external computer. Due to its versatility, it can be used in wearables, HID projects (human interface devices), IoT systems, and robotics. Let us start our detailed discussion about Arduino Micro its pinout, datasheet, features, IDE, andits simulation.                                   Download the Arduino Micro Datasheet Before the launching of Arduino Micro, in 2012, Arduino Leonardo was released in the Arduino ecosystem. Arduino Leonardo was the first board based on the ATmega32U4, it allows USB communication means it can be used as the mouse, HID, and keyboard without any additional hardware. Due to its specific functionality ability, it is used by developers working on assistive technology, and keyboard emulators. Although Leonardo offered a new operating domain because of its USB functionality, because of its large size, we can’t use them in space-constrained projects. This resulted in the launching of a new small-sized, compact version of the Leonardo board named Arduino Micro. In 2013, Arduino released the official version of the Arduino Micro in the Arduino ecosystem in New York, which is a compact, smaller form factor based on ATmega32U4 that includes native USB support. Their weight and there dimensions are given:                 Weight             13 grams                 Length              48mm                Width              13mm       Boards  Dimensional size Microcontroller     Use case USB support Arduino UNO 68.6 mm ATmega328P Broad prototyping no Arduino micro 48 mm ATmega32U4 Robotics, wearables, HID, and drones Present Arduino nano 45 mm ATmega328P IoT and compact prototyping no Arduino pro mini 33 mm ATmega328P Ultra-compact prototyping but no USB interface present No Arduino Leonardo 68.6 mm ATmega32U4 HID Present Many different microcontroller boards introduced in the Arduino ecosystem such as Arduino Nano(A00005), Arduino Pro mini, and many others but the Arduino micro is used in different niche projects where native USB support is needed and it also supports the compact and small size factor form which makes it ideal to use in HID projects especially. Arduino micro features, pinout, technical specification, IDE, and simulation tools in detail are given there: Pinout of Arduino micro is given there: Pin name and number Description Function D0 - D13 Digitals I/O pins but some provide the pulse width modulation output General digital I/O pins. TX - RX RX received or TX transmitted and it can used for UART communication. Support the serial communication. PWM Digital pin I/O no 3,5,6,9,10,11 used and supports the PWM output. Support the pulse width modulation. A0- A11 These are 12 analog pins for input with 10-bit resolution. Analog input pins. 5V Regulate the output of 5V Power supply. SPI Pins support the SPI (serial peripheral interface) communication Support the serial peripheral interface Vin Used for power input when power can't be powered through USB. Used for input voltage. GND General ground pin. Ground pin SDA Data line used for I2C communication. Support I2C communication. USB Supported the USB emulation. Native support of USB. RAW Unregulated input can be accepted by these pins which are up to 12V. Accept teh RAW voltage input. SCL Clock line supported for I2C communication. Support the I2C clock. RESET The microcontroller can be reset through this pin. Reset pin â– Digital pins: 40 mA current is handled or regulated through digital pins which are output or input pins. â– Analog input pins: Analog input pins are used for sensory readings like voltage sensors, temperature, and light. Arduino micro has multiple pins or multiple options for powering them, some are given there: â— 5V pins: this pin directly provides the power supply for 5V to the board but if the voltage increases it damages the board so it supports regulating the voltage of 5V. â— USB port: the microcontroller board is powered through the USB port directly and efficiently. â— RAW pin: the voltage that exceeds 12V  accepted through the RAW pin. â— Vin pin: it supplies a voltage of 7 -12V for powering the board. Due to their multiple power options or pins, it was ideal to use in many different USB projects or HID. â— USB port: it provides serial communication via a USB interface. â— SPI: it supports the SPI communication through the SCK, MOSI, and MISO pins. â— PWM pins: digital I/O pins 3, 5, 6, 9, 10 or the pin 11 can used to generate the input PWM signals and it used for controlling or dimming the LEDs. â— Serial communication: UART communication is supported by the RX and TX pins. â— I2C: SDA or SCL both of these pins are used for communicating with the devices such as displays and sensors. Arduino Micro has numerous unique features that help it to stand in various functionality microcontroller boards. The main key features that make them unique and front-runners are given below: â– Compact size â– Power Flexibility â– Native USB support â– Open source â– Microcontroller â– Broad digital I/O capability In space-constrained projects, their compact and small size makes them ideal to use. Due to the small form factor, it is used in robotic systems, wearables, or drone systems. Vin, RAW, and USB pins are used to supply power to the microcontroller board. RAW pin accepted the unregulated voltage that may damage the board. Their power supply flexibility makes them perfect for using it in numerous projects or battery-powered systems. Native USB support is the key main aspect of the Arduino Micro and it was based on the ATmega32U4. The HID device, keyboard joystick, and keyboard can be emulated through this microcontroller board. Arduino Micro is open-source hardware like the other Arduino microcontroller boards. Arduino Micro has broad digital I/O pin capability some are given there: â— SPI UART and SPI pins: These pins support communication with other devices and components. â— Digital pins: They have 14 digital pins with 7 pulse width modulation pins. â— 12 analog input pins: These pins make them capable of sensors like temperature and light. The technical specifications of the Arduino micro are given there:             Parameters           Technical specifications microcontroller ATmega32U4 Digital I/O pins 20 pins and 7 are supported with PWM Operating voltage 5V Flash memory 32 KB and 4 KB used for the bootloader USB port Native USB support or mini USB interface Analog input pins 12 pins with 10-bit resolution SRAM 2.5 KB Input voltage 7V - 12V Clock speed 16 MHz EEPROM 1 KB Protocols for communication UART, USB, SPI, and I2C Arduino's integrated development environment is used for programming the Arduino micro. It can support C/C++ programming and also allows built-in libraries for numerous common components. The steps that  followed for programming the Arduino micro with IDE are given there: â— Install Arduino IDE: From the official website of Arduino, first install the latest version of IDE. â— Connect board with computer: After installing the Arduino IDE, use a USB cable then connect the Arduino Micro to the PC. â— Choose the board: To select the board go to Tools select board and after this select Arduino micro.                                      Tools> board > Ardunio micro â— Select the port: under the tools select the most appropriate USB port.                                     Tools > port Debugging clues or tips are given there: â— for debugging make sure the board and the port are selected correctly. â— A serial monitor is used for debugging through the USB interface. Simulation tools are professional tools that are helpful and useful for debugging the code or testing the code before deploying it into the hardware. The most common professional tools that are used for Arduino Micro simulation are given there: It is a professional tool, that allows the emulation of advanced microcontrollers. They offer a detailed description of virtual components such as sensors, and LCDs and support the libraries for Arduino.  The steps that are followed in the proteus design tool are given there: â— Download the Arduino library for the proteus. â— Drag and drop the Arduino micro â— After this connect the components and upload the code for debugging and simulation. It is an online professional tool or circuit used to simulate a wide range of Arduino boards, including the Arduino Microsimulation. It helps to: â— Design different circuits efficiently â— Numerous codes are written on web-based environments. â— The behavior of components is simulated through this tool. â— Before uploading the code on the microcontroller board, firstly test the Arduino code in the virtual environment. For prototyping and for simulating the numerous Arduino projects fritzing is used because it is a professional tool. It provides the: â— Breadboard view â— Helps the beginners for simulating the Arduino projects â— Code uploading â— Schematic design â— Provides the general testing capability. â– Input devices and keyboards â— Gaming controllers â— Macro Keyboard â– Automation systems â— Smart home devices â— Lighting system â– STEM projects â– Educational or learning tools â– Environment monitoring system â— Soil moisture â— Air quality â– Automotive applications â— Custom dashboards â— Vehicles diagnostics â– Gesture-based controls â— Touchless interfaces â– Security access control systemGreat Wall Chongqing Huanyu Automobile Sales Company , http://www.huanyuauto.comInception of Arduino Micro(A000053):
Comparison of Arduino Micro with other Arduino Boards:
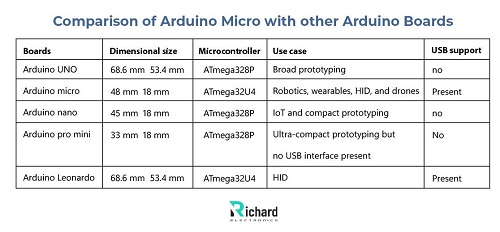
 53.4 mm
 18 mm
 18 mm
 18 mm
 53.4 mm
Role of Arduino Micro in the Arduino ecosystem:
Pinout of Arduino Micro:
Power pins and options:
Other pins:
Key aspects/ features of the Arduino Micro:
Compact size:
Power supply Flexibility:
Native USB support:
Open source:
Broad digital I/O capability:
Technical specification of Arduino Micro:
Arduino IDE for programming the Arduino Micro:
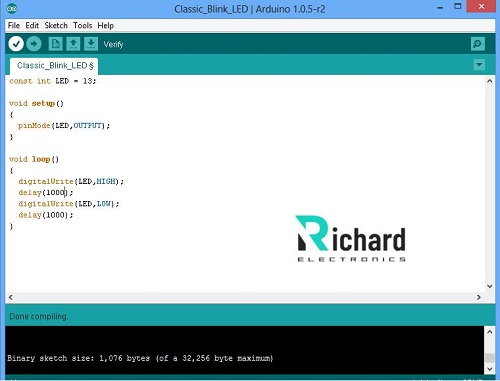
Example code for blinking LED:
Debugging clues:
Simulation tools for Arduino Micro:
Proteus design suite:
Tinkercad:
Fritzing:
Applications of Arduino Micro: